Pages

Showing posts with label DIY. Show all posts

Wednesday, December 28, 2011

Belated Christmas Decor

How was everyone's Christmas? I became violently ill and my poor mother had to cancel the celebrations at our house. I know right, who cancels Christmas? I was THAT sick. No fear, we are making up for it this Thursday by getting together and exchanging gifts. I still feel awful about it though, I kept saying how I ruined Christmas all day!

Anyways, I know Christmas is over, but I figured I would share today's post with you on how to take ordinary thrift shop finds and turning them into festive decor for the holidays! I actually purchased these two ceramic owls at a thrift store for $4 to use as everyday decor, but I so happen to love them as Christmas decorations! I also may have a slight obsession with ceramic or brass animals...I don't know why but they're irresistible to me.

Here are the owls in the state that I purchased them during the summer:


I simply gave them a light cleaning, and sprayed them with Rustoleum semi-gloss white spray paint, making sure to give them light, even coats. After letting them dry, I gave them a quick coat lacquer clear coat to give it a ceramic appearance. Here's the after:
crappy cell phone picture, need to get on that!


And here are the both of them set up at their home for the holidays!


As soon as the Holidays are over, they will be residing on Adam's bookshelf, but for now I like where they are.

Do you have a thing for ceramic animals? Have you ever spray painted a thrift store find?


Wednesday, November 16, 2011

Another Lamp Makeover!

So, I have a minor thing for lamps. I can't seem to pass lamps at a thrift store without wanting to snatch them up even though I have no place for them. It's a problem. Does anyone else seem to have this problem?!

Today I have another lamp makeover that I completed about a year ago. Adam has a really dark living room that only has one large window that doesn't let in a lot of light. So I went thrifting looking for some affordable lamps that I could transform. I found two matching brass lamps that had a good shape and decided they would be mine! Here's one right after I brought them home:

 I bought two of these for $2.99 each. The brass itself isn't bad but it's not the look I was going for. I really wanted something orange to tie into the color scheme with Adams living room. I bought a couple of cans of rust orange Rustoleum spray paint and sprayed the lamps with multiple thin coats after giving the lamp a good cleaning. Here is the result!
I really like the look of high gloss, ceramic lamps that are really popular now so I also bought a can of clear laquer spray paint to give the lamp a shiny appearance after the coats of orange paint dried. Here it is in it's place. As you can see it is really dark in there so it's kind of hard to see but you can get the idea.

I bought the shades at target I think for around $7 so this makeover cost a total of around $28 including the spray paint. Not bad for a two unique lamps and I think they really make the space! I'll share the rest of the room with you soon. Perhaps in the future I will also add some grosgrain ribbon to the shades for some added interest but for now I love the way they look!


Do you have a thing for lamps? Or maybe you have a lamp makeover you'd like to share?

Tuesday, November 8, 2011

Equestrian Style & A Lamp Makeover

Although I am bi-polar and can never really 'nail' my design style, there is one design style that I really love that I believe will never go out of style and that is Equestrian! It is extremely classic, and it has become really popular in the blogosphere and homes today. Case in point:
 
via isuwannee
via roost
via roost
via apartment therapy
 Classic?!, right? Anyways, one day I was out and about at a local thrift store when I came across this bad boy:

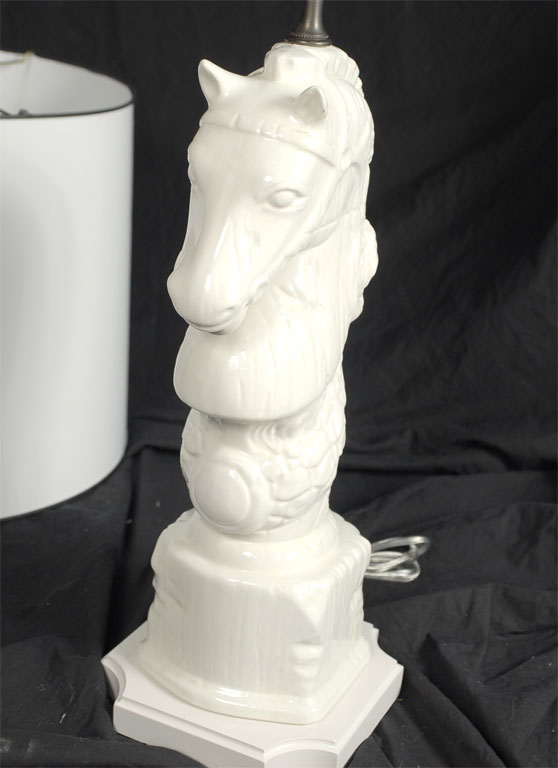
Yup, that's an ugly brown, shiny horse head lamp that I found for wait for it, $1.99! Despite my mother's skeptical glares, I bought the horse head lamp because I knew that I could transform him into something I would love and that could bring a little equestrian style to my own space. So what I did was just tape off the brass detail at the top, wipe him down, and give him a couple of coats of white spray paint and a couple hours later, I ended up with this:
I bought the lamp shade at target for around $7.00 I think. I'm still not sure about it, I think it may be too big, but for now it remains. I also meant to give the lamp a coat of clear lacquer to make it shiny but never got around to it! I really would like to have some sort of a base made for it, perhaps lucite? just to make it look a bit more substantial. And lastly, I would like to line the lamp shade with gold paper to add some interest. We'll see if I ever actually get around to doing those things but for now, I like the way it is. Know what's funny about all of this? I found a nearly identical lamp for sale on 1stDibs for hundreds! (an extremely high-end version of Craiglist for those of you who aren't familiar). Take a look:
via 1stdibs
via 1stdibs
Isn't that crazy? It's almost perfectly identical, except for the price tag. It was also funny to be reading a blog one day and seeing that Grace Bonney of Design Sponge has a similar lamp in her living room which was featured in Lonny Magazine. Check it out:
via twolovelyspaces
I love that her lamp is a fun color which adds a nice pop of color to her living room, and definitely adds that equestrian flare but in a unique, unexpected way. Despite all the things I still haven't completed with my lamp, I still love it and although it's a far cry from the eye candy at the beginning of the post, I think it adds a touch of equestrian style to my desk, and the price wasn't bad either! What about you, have you ever rehabbed a lamp? Or maybe you've added something equestrian to your space?

Monday, November 7, 2011

Mini Bathroom Makeover

Today I am sharing with you a mini bathroom makeover that I recently completed in my parents bathroom. The home they live in was built in the 80s and was ENTIRELY brown when they bought it. I'm talking brown rugs, walls, sinks, counter tops, EVERYTHING. They've really done a great job at updating their home slowly but surely, however, the one thing that remains despite all the renovation is the shiny, wood trim around the windows. So one day, thinking that the bathroom was looking very brown, I decided it needed a mini makeover and the way I was going to accomplish that was with a new window treatment, shower curtain, and to paint the window frame. I failed to take a very good picture before I started the process because I didn't have a blog at the time but here is the best one I have:
As you can see, the walls, window frame, and even the shower curtain were brown. Also, you can't see it but the ceramic floors are a brown color as well. To create some contrast in the space, I decided I was going to first paint the trim around the window, which I had already started doing in the picture above. The way I went about this was to lightly sand the trim, wipe it clean, and begin painting with a high quality 2" angled brush. Again, the key to a smooth, even looking finish it to apply multiple thin coats. Here is the window after a few coats:

At this point I decided that I would use painters tape to avoid painting the walls, making my life a little easier and yes that is a Febreeze bottle holding the window open. I don't have a picture of the frame painted without tape but I do have these 'after' pictures to share:
 You can see how the white trim now adds some much needed contrast between the window and the wall color.

I really like the way the white trim and the new cream shower curtain bought on sale here seem to really brighten up the space. The other project I tackled was the roman shade shown in the pictures above. I don't have step by step instructions or photos but the tutorial I used is by Maria over at Johns Journal. And lastly, to tie in the yellow color in the new roman shade, a new bath mat and yellow hand towel were purchased. Overall, this was a budget conscience makeover kept under $100. Here is the breakdown:

Quart of Behr semi-gloss paint-$16.96
Brush- Already owned
Painters tape- already owned
Bamboo roman shade (Home Depot): around $30.00
Spray Adhesive: Already owned
1.5 yard of fabric (JoAnn Fabrics): $15.00 on Sale
Quilt Binding: $6.00 for 2 packs
Bath Mat: $25.00
Hand towel: $6.00

TOTAL: $98.96


This goes to show that you don't have to put a whole lot of money into a space to give it a whole new look! Have you recently done a mini makeover of your own, or tackled a DIY project? Feel free to share it!